How to Build a Mana Curve

In Magic, your cards have mana costs, and you can only play one land each turn to help cast them. (Now there's some mysterious, expert-level advice for you!)
More mana-intensive cards tend to have more dramatic effects on the game. For one mana, you might be able to cast a Flameblade Adept, but by the time you're up to five mana, you can cast the much fiercer Trueheart Twins.
What all this means is simple: if you can cast a card that costs the number of lands you have on the battlefield every turn of the game, you're going to be playing the strongest card you can each turn. Very few games play out this way (and sometimes it is correct to deviate), but it's important to set yourself up for success as much as possible.
Now, in Constructed formats like Standard or Modern, this can differ a bit. Sometimes it's far more advantageous to unleash a barrage of top-notch one-mana cards, or play a control deck that seemingly wants to cast nothing for its first several turns and then overwhelm you with strong removal spells and gigantic threats. (That's not remotely to say that curve isn't a major factor in Constructed decks—it absolutely is—but there tend to be more exceptions in Constructed formats.)
But in Limited, this kind of gameplay is your bread and butter—the angle most decks try and take to achieve success. How can you build a deck that gives you the best chance of maximizing your lands each turn of the game?
Enter: the mana curve.

The mana curve is the idea that you have, well . . . a curve of mana costs. You draw more cards as the game goes on, meaning that you generally need more copies of cards that cost less and fewer copies of cards that cost more.
This means that in deck building, you want to play the cards that match your curve as best as possible—and cut cards accordingly. For example, if you cut all your two-mana creatures but are playing six four-mana creatures, you probably have a poor mana curve. You should almost certainly cut some of your fours for your twos.
More than any other way, I have seen a larger number of Limited games won by simply curving out with drops on turns two through five than any other method. If you hit your drops each turn and your opponent stumbles, they're quickly going to be put on the back foot.
This is an excellent method to start building any deck. Today we're going to be looking mostly at Limited, though, heeding my previous note in mind, it is a great way to build a Constructed deck as well (especially aggressive ones).
So, how should you build your mana curve? Let's take a look at a few tips for building a mana curve in Limited.
1. Noncreature Spells (Mostly) Below Creatures
The general way you lay out a mana curve is from left to right with a pile for each converted mana cost, with the lowest converted mana cost cards in the leftmost pile, the highest on the right, and a pile for each other mana cost in between in ascending order. (Unless you're Ken Nagle, in which case you do it right to left.)
However, there's an important distinction to make here: you need to see what you're actually going to want to cast at each mana cost, not what you can cast at each mana cost.
For example, let's look at Shed Weakness.
This card costs one mana . . . but it certainly isn't a card you're going to play on the first turn! Saying this fills your quota of one-mana cards isn't true at all.
As a result, you should separate out your cards by whether you will want to play them on the turn you get that much mana. Put the ones you do want to cast on that turn in one row, and your other cards—generally noncreature spells—that you aren't below them. This usually puts creatures up top—but not always. For example, take Bounty of the Luxa.
This is a card that I'm going to want to play on turn four if possible. Therefore, it should go in the top row since I actually want to cast it that turn. You should end up with something that looks like this:

You still want to separate the spells you aren't casting by mana curve because that's good to know. (For example: knowing all your removal spells cost four could be very informative to your creature curve.) But when it comes to figuring what you're going to cast each turn, the top primarily creature row is the most important.
2. Put Cards Where You Expect to Cast Them
Of course, it's not always clear where a card should go—and Amonkhet complicates the issue further.
Where should a cycling card go? What if it has a cycling trigger? What about a card with X in its cost? What about if its cost can be reduced?
My most fundamental advice is this: put cards on your mana curve wherever you think you are most likely to use them.
For example, in the case of Bone Picker, I'd put this in my four-drop slot. If I can cast it for one mana, that's awesome, but I should expect it to be four most of the time.
On the other hand, I'd expect to cycle Deem Worthy more often than I'm going to hard-cast it. I'd put it in my four-drop slot as well.
Additionally, there's a big difference between these two cards. One can't always be cast for its cheaper cost and one can. So if I have four mana, I can always get use out of Deem Worthy, but if I have one mana, I can't always get use out of Bone Picker.
What about normal cycling costs?
In general, I would tend to put these on your mana curve presuming you are casting them as normal—and then cycle them in game when you're in a situation you need to cycle them. With that said, if you're including a card in your deck that you may occasionally cast but mostly intend to cycle—for example, Dissenter's Deliverance—I'd put it in the cycling slot. Put it wherever you're going to use it more.
How about aftermath?
This is pretty clearly a three-drop in my book: you want to cast this on turn three, and you can't cast the other side from your hand.
With that said, you should keep in mind that having a spare six mana at some point could net you cards—but I wouldn't put this as a six on your mana curve. Similarly, it's important to always keep any activated abilities on your creatures in mind, as those are ways to use your mana as well.
Here's a weird one for you: where do you put this?
This one is a bit of a stumper.
What I like to do with Endless One is put it where I think it will be most powerful, which is usually as a three-mana 3/3 or a four-mana 4/4. Of course, as the situation dictates, I'll cast it for whatever seems correct—but it's good to note where it's best.
And, of course, use your judgment and keep your flexible costs in mind. You can't have the same piece of cardboard in two places at once, so if you have a card with a flexible cost, note it while figuring out your mana curve.
3. Follow some Rules of Thumb
So now that you've learned all this, about how many cards do you want at each cost, anyway?
Well, Gavin, that's a great question.
As noted earlier, you generally want more cheap costs and fewer expensive costs, because over time, you're more likely to find your high-cost cards. Every deck is going to vary a bit based on what its game plan is and what you ended up with, of course. But, if you can, what you want is something (in your "creature row," not your "spell row") that looks roughly like this:
- 1+ mana: 0–2
- 2+ mana: 4–6
- 3+ mana: 3–5
- 4+ mana: 2–4
- 5+ mana 1–3
- 6+ mana: 0–2
Or, in graphic form, like this:
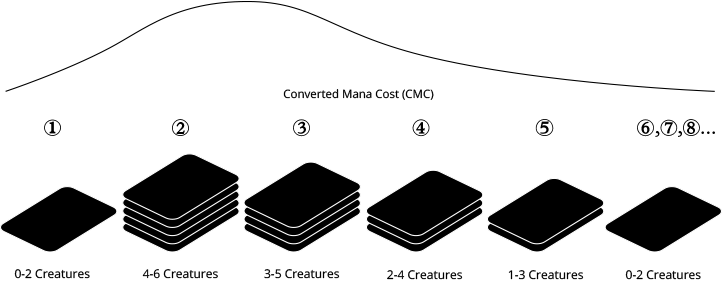
Astute readers out there might notice these numbers are slightly different than my normal Prerelease primer numbers. That's because that article is geared more toward Sealed and less toward Draft (which tends to be more aggressive), and because y'all are getting some advanced caveats.
Why each of these? Let me run down them.
One-drops, despite being the thing you would want on turn one—and theoretically would want to be the most of—tend to be weak and quickly have diminishing returns over the course of the game. This is something you see the largest disparity of between Limited and Constructed.
Why? In Constructed you have all the most powerful one-drops at your disposal, and you can maximize your deck to use them.
In Limited? Not so much.
Two-drops, on the other hand, are pretty crucial. You're either going to want to be attacking with yours or trading with your opponent's. They also fit well into off-curve turns—for example, playing a two-drop and a three-drop on turn five. Even if you're not a deck that wants to attack, blocking with a two-drop against an aggressive deck is going to save you a lot of life.
Three-drops have a similar philosophy to two-drops, only they fit into your off-curve turns a little worse and you have a bit more time to draw them.
The four-mana slot is when you get to a real turning point and you start to want to not have too many cards. While you want to play a four-drop on turn four, you don't want to have too many of them. Having an opening hand with two or three four-drops can make your draw pretty slow.
Five mana is even rougher than four. You need to hit your fifth land drop—which you won't always do. I generally want to top my curve out around here.
Six or more mana means the card needs to be very strong for me to want to play it. A big green trampler, a bomb rare, or something that is going to have a large impact on the game are all great expensive cards—but I want to save these slots for the best. (And eschew them entirely if I'm an aggressive deck.)
And there's one other important rule.
4. When in Doubt, Go Cheaper
Years ago, I was talking with one of the best Magic Online Limited players ever, Charles "Aceman" Dupont. Out of nowhere, he nonchalantly threw out a piece of advice that I grabbed midair, put into my pocket, and immediately started using—and found great success doing so.
His advice was simple: "When a decision is close, play the cheaper card."
This applies to the draft as well as deck building—you should be drafting with curve in mind, of course—and is a great point.
You can always cast a four-drop when you could cast a five-drop, or a three-drop when you could cast a four-drop. The opposite is emphatically not true.
An easy way to lose in Magic is to just draw the wrong mix of lands and spells. And if you draw too few lands, you want to mitigate that as much as possible; not being able to cast your spells is a big issue. Skewing your deck cheaper, where possible, does this while also giving you a better chance of making your early plays.
This is just advice to be taken when the choice is close. I wouldn't go cutting your Hazoret the Fervent for Minotaur Sureshot. But if it's a close choice, try going lower.
5. Know When to Stray
Like almost all skills, you go through three steps.
The first step is learning the rules.
The second step is following the rules.
The third step is learning when to break the rules.
And in Magic, well, there are certainly times to break the rules. (Well, at least when it comes to the "rules" in this article about building a mana curve.)
A common example is when you draft a highly aggressive deck. In those decks, I want my curve to be very low and to top out at five or even four mana. I want an abundance of two-drops and all the cheap combat tricks I can cast. I may put my cheap tricks on my mana curve in this case since I do plan to cast them early.
Maybe I draft a control deck, and my early removal spells are actually on the top part of my curve. They're all there to help me get to my long-game threats. If I build a Constructed control deck, I'm certainly putting my counterspells on my mana curve since I am planning to cast them on their respective turns if possible.
This is all to say one thing: you will see successful variations on what is described here. You can take advantage of these yourself. But it's equally important to know when to deviate, so master the fundamentals above, build a curve, and learn along the way about the best methods to switch onto a different plan. In Magic, there's always plenty of room for ingenuity.
Just Around the Riverbend
Mastering your mana curve is a tricky skill—and one for which I hope this article has provided you the tools. Whenever I'm in doubt, I try to curve out.
And with Pro Tour Amonkhet in the books last week, I know I'm excited to get out and draft Amonkhet some more. You'll be able to find me exerting creatures and cycling cards at some Draft table in Seattle. Maybe I'll see you there.
Have any thoughts or comments? Would you like to see an article like this one, but for Constructed decks at some point? Please let me know! You can always reach me on Twitter, Tumblr, or by sending me an e-mail in English at BeyondBasicsMagic@gmail.com.
Talk with you again next week, and have fun!