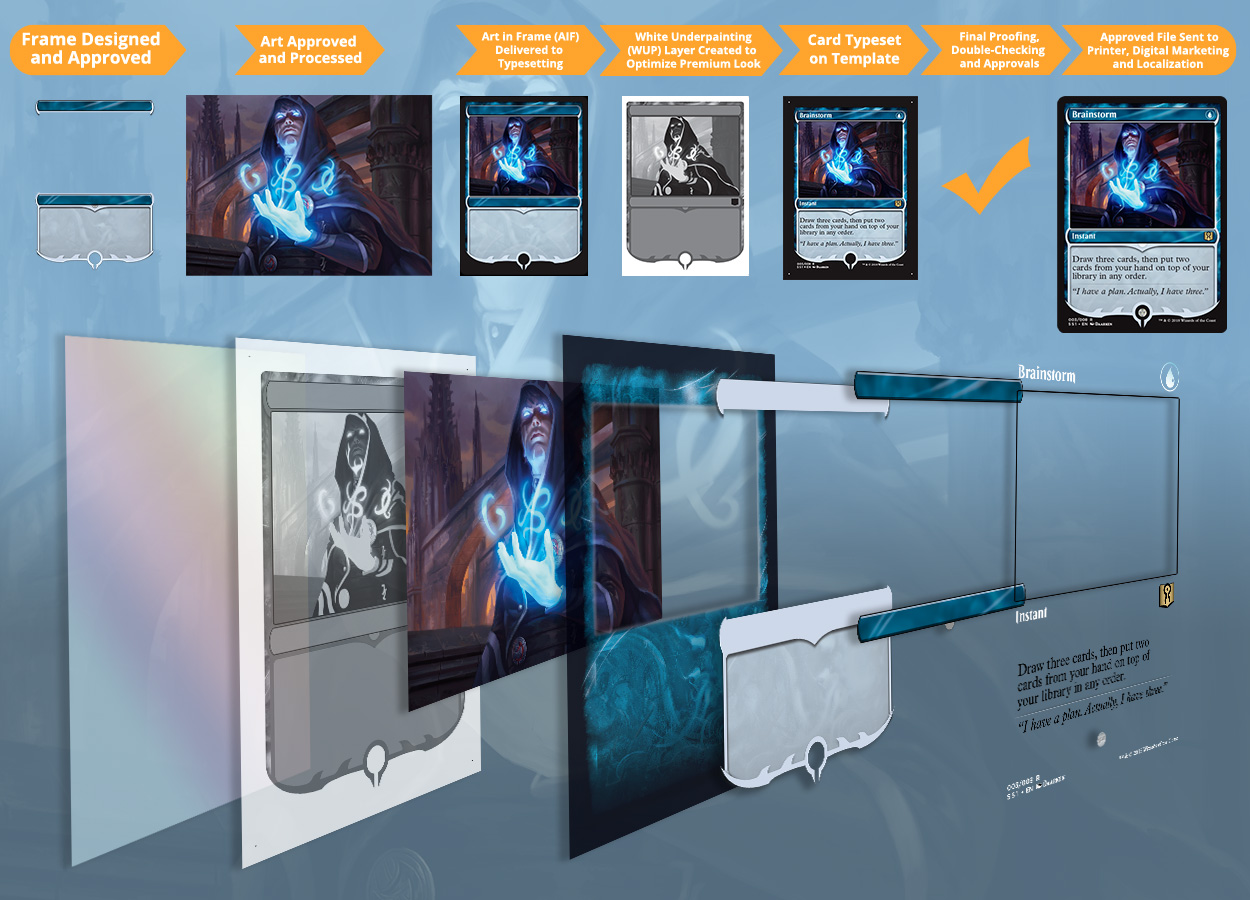
Building a Card
This week, I thought it might be interesting show you a bit about how we build cards—and I don't mean designing for gameplay. I mean the process by which digital cards get built and prepared for manufacturing.
For this process it is best to use an example, and for this we will use Brainstorm from Signature Spellbook: Jace.

First, James, our R&D creative designer, has a great idea for a card-frame design. The design he has in mind will also require a unique twist, a different shape for the holographic stamp that appears on all rare and mythic rare Magic cards.
For production, these design requirements demand specific manufacturing techniques. Cards where an individual face design extends to the edge are known as "uncommon bleed," and more traditional black borders, as in this case, are "common bleed." Each style of design requires a different setup and cutting tools, so any time we build a new frame design, we evaluate it for production technique before moving on to further stages. The new stamp shape also requires that a new tool be created and tested for accuracy in size and placement.
With the reproduction process sorted, we can get to assembling our files. First, James finishes complete design mockups of our card, and those make the rounds for approval. Around the same time, our art directors receive and approve the finished illustration. With the design of the frame and art complete, James hands off the digital layered files to our Graphic Production Services team (GPS) for color correction, typesetting, and final assembly.
The first process to be completed by the GPS team is preparing the illustration and card frame for reproduction. Our imaging specialist will first color-correct the illustration and adjust scale and image resolution as necessary for the finished card size. It is then combined with the designed frame elements and color-proofed for approval. If the card were of the regular variety, this would be it for imaging
Most Magic premium cards are printed on a holographic foil laminate that is glued to the surface of the paperboard. In order to create visually shiny and opaque textures within the illustration and frame design of a card, certain elements are under-printed with different values of white ink. To have this printed, a special separation needs to be created in the digital file for the card. The imaging specialist works with the art director to build this layer to achieve the desired effect.
With the finished art in frame (AIF) and WUP done, the card is now off to a GPS typesetter.
In typesetting, the card is first placed into a layout template in InDesign of the exact card size and style. Sometimes an existing template can be used, but often, as with Brainstorm, a new template must be created. The typesetter imports text and information such as mana symbols into position from a card database. After text and symbols have been placed, additional digital rounds of proofing are conducted to make sure everything from the casting cost to the artist name are correct. It is during this stage that the card numbering is applied.
As a final step, our card file is checked for resolution, proper color profile, and color build. It is also double-checked by our prepress tech against the print specification to make sure it supports all of the printing plate separations necessary for reproduction. At this stage, a final internal contract color proof might be pulled. Once approved, a final PDF print-ready file is renamed, prepared, and made ready for transfer to our card production vendor. It is also at this stage that other variants of the file are created to support digital expressions such as marketing, web, and Gatherer.
With our card file done, the work of our internal creative and technical teams is complete. However, more work needs to be done by our vendor and production team before our card is finally ready to print. But that's for another time.
Till then.
